The following post describe how to configure a CentOS 8 server in order to send trusted emails. It won’t accept incoming mails of any kind. For this example, I’ll use the following parameters about the sender server:
- Hostname: server.zxcv.es
- IPv4: 78.46.128.213
- IPv6: 2a01:4f8:160:5275::2
- Domain: zxcv.es
- Personal email address: [email protected]
- Mail clients (Docker IPs which I’ll use to send mails): 172.16.0.0/12
The first step is to configure the PTR record of your server. This should be managed by your hosting provider or your ISP, so you have to check. Hetzner, for example, let’s you easily configure it for each IP.
At your DNS provider you will also need to configure some records:
| Record type | Name for the record | Value for the record |
| A | server | 78.46.128.213 |
| AAAA | server | 2a01:4f8:160:5275::2 |
| MX | @ | server.zxcv.es |
| TXT | default._domainkey | Contents of /etc/opendkim/keys/zxcv.es/default.txt |
| TXT | @ | v=spf1 mx ip6:2a01:4f8:160:5275::2 -all |
| TXT | _dmarc | v=DMARC1; p=quarantine; rua=mailto:[email protected]; ruf=mailto:[email protected]; pct=100; aspf=s; adkim=s; sp=quarantine |
As can be supposed, the default._domainkey can’t be set yet, so let’s configure the server. Start ensuring the hostname is set up appropriately and install the required packages.
hostnamectl set-hostname server.zxcv.es
dnf install -y postfix mailx opendkim
Now let’s configure OpenDKIM in order to sign outgoing emails:
mkdir /etc/opendkim/keys/zxcv.es
opendkim-genkey -b 2048 -d zxcv.es -D /etc/opendkim/keys/zxcv.es -s default -v
chmod -R ug=rwX,o=- /etc/opendkim/keys
chown -R root:opendkim /etc/opendkim/keys
chmod 640 /etc/opendkim/keys/*/default.private
#opendkim-testkey -d zxcv.es -s default -vvv
cp /etc/opendkim.conf /etc/opendkim.conf.bak
vi /etc/opendkim.conf
systemctl enable --now opendkim
When editing the /etc/opendkim.conf, it is recommended to read all settings and adjust all of them as needed. I configured mine like the following:
PidFile /run/opendkim/opendkim.pid
Mode    s
Syslog  yes
SyslogSuccess   yes
LogWhy  yes
UserID  opendkim:opendkim
Socket  inet:8891@localhost
Umask   002
SendReports     No
SoftwareHeader  No
Canonicalization        relaxed/relaxed
Domain  zxcv.es
Selector        default
MinimumKeyBits  1024
KeyFile /etc/opendkim/keys/zxcv.es/default.private
OversignHeaders From
QueryCache      yes
After configuring DKIM you’ll be able to configure the default._domainkey DNS record.
Now, the only thing left is configure postfix:
cp /etc/postfix/main.cf /etc/postfix/main.cf.bak
vi /etc/postfix/main.cf
systemctl enable --now postfix
Like the OpenDKIM configuration, /etc/postfix/main.cf should be reviewed to be configured. My configuration ended up being the following:
compatibility_level = 2
queue_directory = /var/spool/postfix
command_directory = /usr/sbin
daemon_directory = /usr/libexec/postfix
data_directory = /var/lib/postfix
mail_owner = postfix
myhostname = server.zxcv.es
mydomain = zxcv.es
myorigin = $mydomain
inet_interfaces = localhost, 172.17.0.1
inet_protocols = all
unknown_local_recipient_reject_code = 550
mynetworks = 127.0.0.0/8, 172.16.0.0/12
alias_maps = hash:/etc/aliases
alias_database = hash:/etc/aliases
smtpd_banner = $myhostname
sendmail_path = /usr/sbin/sendmail.postfix
newaliases_path = /usr/bin/newaliases.postfix
mailq_path = /usr/bin/mailq.postfix
setgid_group = postdrop
html_directory = no
manpage_directory = /usr/share/man
readme_directory = /usr/share/doc/postfix/README_FILES
smtpd_tls_cert_file = /etc/pki/tls/certs/postfix.pem
smtpd_tls_key_file = /etc/pki/tls/private/postfix.key
smtpd_tls_security_level = may
smtp_tls_CApath = /etc/pki/tls/certs
smtp_tls_CAfile = /etc/pki/tls/certs/ca-bundle.crt
smtp_tls_security_level = may
smtp_tls_loglevel = 1
meta_directory = /etc/postfix
shlib_directory = /usr/lib64/postfix
#opendkim
milter_default_action = accept
milter_protocol = 6
smtpd_milters = inet:127.0.0.1:8891
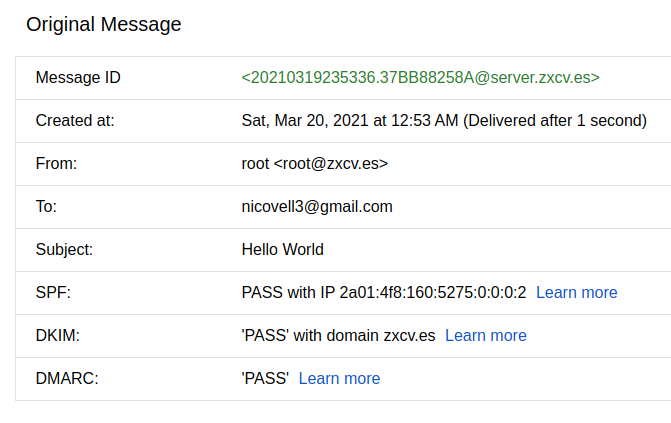
non_smtpd_milters = $smtpd_miltersFinally, a test email can be sent with the mail command (don’t forget the last point to end the body):
mail -s "Hello World" [email protected]
Hello!
This is my test mail
.
Once the email is received at the Gmail inbox, these are the details displayed when clicking at “Show original”:
Remember configuring your firewall to accept incoming connections just for your allowed clients and don’t disable SELinux 🙂
Leave a Reply